Buying a home in Northern Virginia means dealing with more than just property lines and inspection reports. Many houses here come with wood-burning fireplaces or gas inserts that add comfort and value—but they also require careful evaluation. Before you close, a detailed chimney inspection checklist helps you confirm the system’s condition, safety, and compliance with local and national standards.
You want to protect your investment and avoid costly surprises later. A professional chimney inspection reveals issues a standard home inspection might miss, such as hidden cracks, blockages, or improper venting. It also helps you understand if the fireplace, stove, or flue has been maintained according to safety codes that apply in Northern Virginia’s mix of older and newer homes.
In this guide, you’ll discover why chimney inspections matter before you finalize a purchase, how to tell if this checklist applies to your property, and what a proper inspection should include. You’ll also learn what common assumptions about chimney safety get wrong—and how to use the results to make smart, informed decisions before signing the final paperwork.
Why Chimney Inspections Matter Before You Close
A chimney inspection helps you understand the true condition of a home before signing a purchase contract. It reveals safety risks, structural weaknesses, and repair costs that might affect your decision or budget.
How Chimney Condition Can Affect Safety, Insurance, and Negotiations
A damaged or blocked chimney can trap smoke or carbon monoxide, creating serious safety hazards. Cracked liners, missing caps, or loose bricks can also raise the risk of house fires or moisture intrusion. By identifying these issues early, you protect your household and avoid unexpected repair bills.
Some insurance companies require proof that the chimney meets safety standards before offering coverage. If an inspection uncovers code violations or fire hazards, repairs may be necessary to qualify for a policy.
Inspection findings can also strengthen your negotiation position. You can request seller credits, negotiate a lower price, or require repairs before closing. A clear inspection report verifies that your investment is safe and helps you make an informed, confident purchase.
Is This Checklist Relevant to Your Home Purchase?
A detailed chimney inspection protects you from hidden costs and safety risks that a general home inspection may overlook. Your home’s age, fireplace use plans, and inspection scope each affect how relevant this checklist will be during the home-buying process in Northern Virginia.
Buying an Older Home Versus Newer Construction
Older homes often have masonry chimneys built decades ago using brick, clay tiles, or mortar that may have weakened with time. In Northern Virginia, many pre-1980 houses have chimneys with cracked liners or missing flue tiles. These issues can allow heat or gases to leak into living areas. You should confirm that repairs or upgrades meet current building codes.
Even newer homes can show early signs of wear. Many builders use prefabricated, metal chimney systems covered by wood-framed chases and capped with thin galvanized steel. These components can rust and leak within 10 to 15 years. Checking for moisture stains, damaged flashing, or rusted chase covers helps you catch problems before they worsen.
If your purchase involves any remodel or addition, ensure vents were reconnected properly. A professional Level 2 inspection uses internal cameras to identify structural or liner problems that visual checks often miss.
Purchasing a Home With a Fireplace You Plan to Use
If you plan to regularly use the fireplace, the chimney inspection becomes essential. Regular burning creates soot and creosote buildup that can restrict airflow and pose fire hazards. Ask for maintenance records and the last cleaning date from the seller or property agent.
Inspectors evaluate:
- The firebox and damper
- The flue liner’s condition
- Proper smoke ventilation
- Presence of any blockages or nesting debris
A clean flue protects both your home and health. Carbon monoxide leaks or poor drafting are common results of neglected chimneys. In Northern Virginia’s damp winters, trapped moisture can increase corrosion or cracking inside the flue. A detailed inspection lets you estimate maintenance budgets and determine whether an insert or relining is needed before your first fire season.
Situations Where a Standard Home Inspection May Fall Short
A typical home inspection includes only a surface look at visible parts of the chimney and fireplace. Inspectors rarely access the flue interior, attic sections, or concealed joints. Problems such as liner cracks, loose mortar, or hidden water leaks may remain unnoticed until after closing.
Standard inspections also don’t verify whether wood, gas, or pellet systems were installed per manufacturer specifications. If the system lacks proper clearance from combustibles or vents improperly, it can create fire or carbon monoxide risks.
Scheduling a Level 2 chimney inspection by a certified technician fills these gaps. This specialized evaluation uses cameras and diagnostic tools to review the chimney from foundation to crown. Having both inspections coordinated during the home-buying process helps you make informed repair or negotiation decisions before finalizing the purchase.
What This Checklist Covers and What It Does Not
A chimney inspection checklist helps you determine whether the fireplace and venting system are functioning safely and efficiently. It focuses on visible and structural elements while leaving more technical analyses to licensed professionals with specialized equipment.
Visual and Functional Evaluation Versus Internal System Diagnostics
A chimney inspection checklist usually includes a visual review of exterior and interior components, such as the flue, crown, flashing, masonry joints, and damper. You check for cracks, rust, water stains, blockages, and other signs of wear. These tasks assess how well the chimney appears to perform and whether it meets basic safety and maintenance standards.
However, this type of inspection does not cover deep internal diagnostics. Hidden issues—like creosote buildup inside flue liners or damage within sealed sections—often require video scanning tools or smoke testing. You can note visible warning signs, but accurate detection of interior damage should be left to certified chimney inspectors.
Use the checklist as a screening tool to identify areas that might need professional evaluation rather than as proof of complete structural soundness.
| Covers | Does Not Cover |
|---|---|
| Exterior masonry, cap, crown, flashing | Internal liner integrity |
| Damper and door function | Chimney draft measurement |
| Signs of obstruction or moisture | Carbon monoxide leakage testing |
Differences Between General Home Inspections and Chimney-Specific Reviews
A standard home inspection checklist rarely addresses chimney systems in full detail. Most home inspectors confirm that a chimney exists, appears stable, and shows no visible defects or safety hazards. Their tools and training often focus on broader building systems like foundations, roofs, and HVAC units.
By contrast, a chimney-specific inspection dives deeper. Certified chimney experts evaluate both fire safety and operational factors, sometimes performing smoke pressure tests or interior camera scans. These methods reveal internal deterioration or combustible buildup that a general inspection may overlook.
If you rely only on a home inspection, you might miss early indicators of structural failure or ventilation problems. Scheduling a dedicated chimney review after an initial walkthrough ensures your fireplace meets local safety codes and performs reliably through Northern Virginia’s heating season.
Chimney Systems in Northern Virginia: What Buyers Are Actually Dealing With
Home buyers in Northern Virginia often encounter chimney systems that range from hand-laid masonry models in older Fairfax County neighborhoods to more compact factory-built systems in modern townhouses. Local weather patterns and building trends directly affect how these chimneys perform, age, and require maintenance.
Masonry Chimneys and Clay Liners in Older Homes
Many homes built before the 1980s in Northern Virginia feature masonry chimneys constructed from brick or stone. These systems often include clay tile liners that guide smoke and gases safely upward. While durable, clay liners can develop cracks over time due to heat stress or shifting mortar joints.
You should check for spalling bricks, missing mortar, and loose flashing. These signs usually point to moisture intrusion or prolonged wear. A certified chimney inspector may use a video scope to review the flue’s interior for cracks or obstructions.
If damage is found, repair options include installing a stainless-steel liner or having the chimney relined with a cast-in-place material. These updates bring older systems up to modern safety standards and can improve draft efficiency. It’s also important to confirm the chimney meets National Fire Protection Association (NFPA) inspection standards.
| Common Issues | Inspection Focus | Typical Solutions |
|---|---|---|
| Cracked clay tiles | Internal flue scan | Stainless-steel liner |
| Brick deterioration | Exterior visual check | Tuckpointing, waterproofing |
| Inefficient draft | Smoke test | Cap replacement, damper repair |
Factory-Built Chimney Systems in Newer Properties
Many newer homes and townhouses, especially those built after the 1990s in Fairfax County and nearby suburbs, use factory-built or prefab fireplaces. These systems often vent gas fireplaces or modern wood-burning inserts through lightweight metal chimneys.
Unlike masonry systems, factory-built chimneys rely on insulated metal flues and sealed joints. These components require regular inspection to confirm that sections remain tightly joined and free from corrosion. You should ensure fire stopping materials are intact where chimneys pass through walls or ceilings.
Because prefab units are manufacturer-specific, you need to know the model and installation year. Replacement parts must match the brand to maintain fire safety listings. Annual professional inspection helps detect warped sections, rust, or blocked terminations—problems that can cause poor venting or fire hazards.
Climate-Related Wear From Freeze-Thaw Cycles and Moisture
Northern Virginia’s mixed climate of humid summers and freezing winters causes heavy wear on chimneys. Moisture trapped in masonry or metal expands during freeze-thaw cycles, leading to cracks, leaks, and structural instability.
You should look for white powdery efflorescence, rust stains, and damp patches near the firebox or attic area. These often signal water entry points. Even factory-built systems can suffer from deteriorating exterior chase covers or missing top flashing.
Routine maintenance like waterproof sealing, installing a chimney cap, and clearing gutters reduces long-term damage. Inspectors usually recommend testing moisture levels around the crown and flue base to prevent corrosion and interior mold growth. In damp regions of Fairfax County, annual moisture protection is often as important as the sweep itself.
How a Professional Chimney Inspection Is Typically Conducted
A thorough chimney inspection helps ensure your fireplace, venting system, and chimney structure are safe and fully functional. Certified chimney inspectors often assess visible components first, then move inside to check internal parts and safety devices using specialized tools and cameras when needed.
Initial Exterior and Roofline Assessment
Your inspection usually begins outside. The chimney inspector checks the visible structure from the ground and, when safe, from the roof. They look for cracks, missing mortar, damaged bricks, loose flashing, or a deteriorated crown. These surface issues can let water in, weaken the chimney, or create fire hazards.
Inspectors often verify the condition of the chimney cap, which blocks rain, debris, and animals. They also inspect how securely the cap and flashing connect to the roofline. In Northern Virginia, where seasonal humidity and snowfall can speed up masonry wear, this step is especially important.
A table of common exterior issues may include:
| Problem | Risk | Typical Recommendation |
|---|---|---|
| Cracked mortar joints | Water intrusion, masonry damage | Repoint or reseal |
| Rusted flashing | Roof leaks | Replace or reseal flashing |
| Damaged cap or crown | Animal entry, water issues | Replace or repair cap |
Firebox, Flue, and Damper Evaluation
Inside your home, the inspector shifts attention to the firebox, smoke chamber, and flue liner. These components handle intense heat and smoke, making them key to overall safety. You can expect the inspector to check for loose bricks, creosote buildup, and cracks that could let heat or gases escape into walls.
The damper is tested next. A professional ensures it opens and closes smoothly, seals properly, and keeps drafts out when closed. Poor damper performance can waste energy and allow smoke to enter living spaces.
If you’re purchasing a home, a Level 1 chimney inspection often covers these visible areas. If the fireplace has been changed or if damage is suspected, the inspector may advise a Level 2 chimney inspection, which adds internal checks using cameras and access panels.
When Advanced Tools or Camera Inspections Are Used
Modern chimney inspection services often include advanced equipment. Certified chimney inspectors use video cameras to inspect the full length of the flue without dismantling parts of the structure. These high-resolution visuals reveal hidden cracks, blocked sections, or creosote buildup that a light or mirror could miss.
In cases where smoke stains, odors, or draft issues appear, these inspections help pinpoint the problem source. A chimney sweep may then recommend a chimney cleaning or additional testing if the flue shows thick soot or combustible residue.
Specialized tools also measure airflow and detect leaks in connected systems like dryer vent cleaning lines. This ensures all venting pathways in your home operate safely and efficiently.
How Experienced Local Companies Like A Chimney Expert Approach Buyer-Focused Inspections
Companies such as A Chimney Expert adapt their inspections for home buyers who need clear, documented results before closing. Their certified chimney inspectors combine visual assessments, camera scans, and written condition reports tailored to real estate transactions.
They usually provide a checklist noting each component—flashing, damper, smoke chamber, flue, and exterior masonry—marked as satisfactory or in need of repair. You may receive digital photos and repair estimates for budgeting purposes.
Local chimney technicians understand how Northern Virginia’s weather and construction styles affect brickwork and venting. They work alongside your professional home inspector to coordinate findings, ensuring nothing is overlooked. This approach helps protect your investment and satisfies the inspection standards most insurers and lenders require.
Inspection Checklist: What Should Be Evaluated Before Purchase
A thorough chimney inspection helps you identify potential safety hazards, maintenance needs, and hidden costs before finalizing a home purchase. You should focus on the structural integrity, interior components, signs of past misuse or damage, and compliance with modern safety standards.
Chimney Structure and Masonry Condition
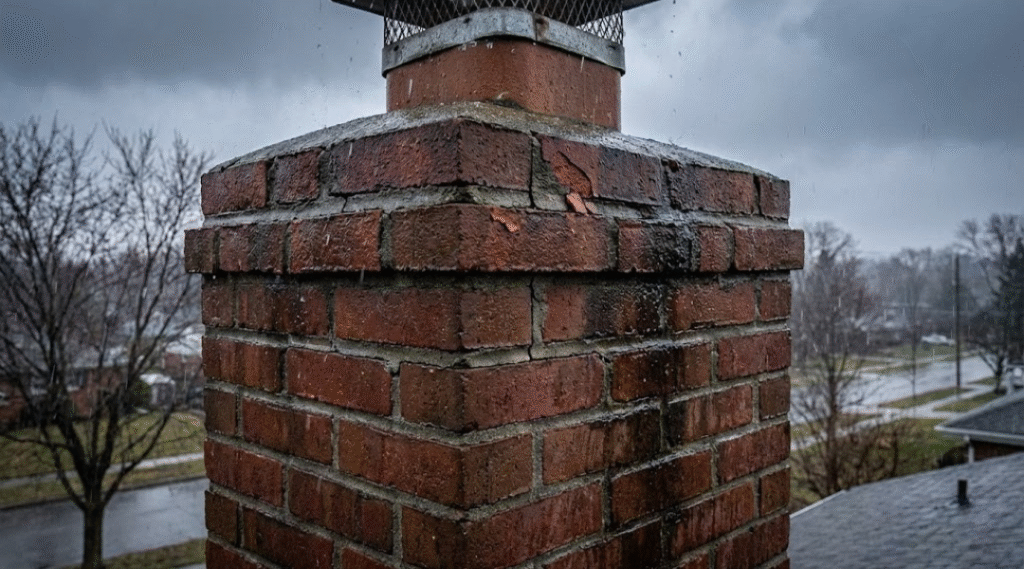
Look at the chimney structure for cracks, leaning, or missing mortar joints. Masonry damage often indicates movement, moisture intrusion, or prolonged weather exposure. Inspect the brickwork and mortar for spalling or erosion, which can weaken the chimney’s stability and lead to costly rebuilds.
Check if the chimney crown—the top concrete surface—is intact and sloped to shed water. Broken or flat crowns allow rain to enter, accelerating deterioration. Use binoculars or a photo inspection if the height limits direct access.
Ask your inspector to evaluate any settling or separation where the chimney meets siding or roofing. Poorly sealed gaps may suggest structural movement or previous inadequate chimney repairs. Even minor cracks can let in water and freeze-thaw cycles can worsen the damage over time.
Liner Integrity and Clearance Issues
The chimney liner protects your home’s structure from heat and combustion byproducts. You should confirm that a safe and continuous liner is present and properly sized for the fireplace or heating appliance. If a liner is missing or damaged, chimney liner installation may be required.
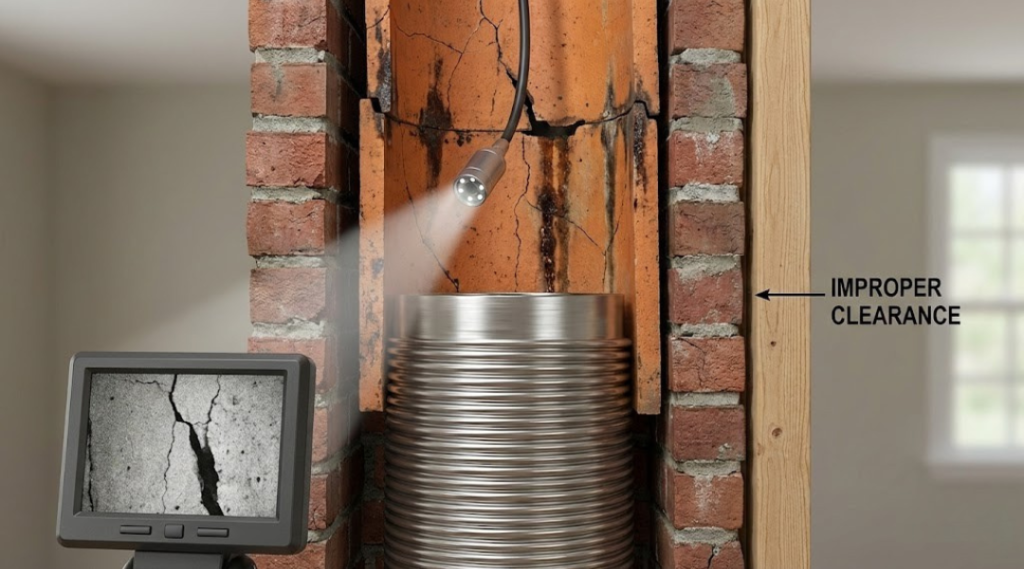
Inspectors often use cameras to assess the liner’s interior. They look for cracks, gaps, or corrosion that could leak gases or heat into nearby framing. Pay attention to clearance between the liner and combustible materials. Insufficient spacing increases the risk of heat transfer and potential fire hazards.
If the chimney serves a gas or oil furnace, flue liners made of stainless steel or other approved materials should be in good condition. Damaged clay tile liners might require repair or relining to meet NFPA standards.
Evidence of Prior Fires, Creosote Buildup, or Improper Use
Residue inside the chimney flue reveals a lot about how the fireplace was used. Heavy creosote buildup—a black, tar-like substance—indicates incomplete combustion or infrequent cleaning. This buildup is flammable and can cause a chimney fire if left untreated.
Ask your inspector to note discoloration or heat marks on the masonry, flue tiles, or damper area. These signs often suggest a prior chimney fire or overheating event. Evidence of melted metal or warped dampers also points to past unsafe use.
Improper burning materials such as treated wood or trash can leave unusual deposits or chemical stains. Regular maintenance and cleaning reduce these issues, but a pre-purchase inspection is your best chance to discover them early and plan for necessary chimney repairs.
Caps, Crowns, Flashing, and Water Intrusion Risks
Water is one of the most destructive forces affecting chimneys in Northern Virginia’s climate. A properly fitted chimney cap keeps out rain, snow, and animals. Your inspector should ensure it’s secure, rust-free, and well-screened. Rust or missing mesh allows birds and debris to enter the flue, causing blockages.
Examine the chimney crown, flashing, and masonry joints for moisture signs. Damaged flashing—the metal seal between chimney and roof—often allows leaks into attic framing. Stains, efflorescence, or moss on the bricks suggest long-term water damage that may require repair or resealing.
Moisture problems can lead to mold, weakened mortar, and interior ceiling stains. Ensure all components direct water away from the chimney’s base and exterior walls.
Safety Compliance and Usability Concerns
An effective inspection also reviews whether the fireplace and chimney meet current building and fire safety standards. Ask the inspector to verify that smoke and carbon monoxide are venting properly. Poor draft or backflow often indicates blockage or design flaws in the chimney flue.
Check that key components—such as the damper, firebox, and hearth clearance—function correctly. A stuck or missing damper can waste energy and let rain or pests inside. Confirm that protective hearth extensions meet required distances from combustible materials.
Finally, review the full inspection report for noted hazards or code violations. Addressing these before closing can save you from expensive post-purchase chimney repair and ensure safe, efficient operation once you move in.
Why Common Assumptions About Chimney Safety Can Be Misleading
Visible cleanliness, recent maintenance, or a seller’s assurances can give a false sense of security about chimney safety. Real safety depends on internal conditions, structural soundness, and compliance with inspection standards established by organizations such as the Chimney Safety Institute of America (CSIA) and the National Fire Protection Association (NFPA).
“The Fireplace Looks Clean” Misconception
A clean-looking fireplace often hides unseen problems. Creosote, which collects on the inner flue walls, may not be visible from the hearth but can still pose a major fire hazard. Cracked liners, missing mortar, or damaged dampers can exist even when surfaces look spotless.
You can’t rely on appearance alone to judge chimney safety. A certified inspection includes tools like video scanning that check areas behind the face of the fireplace and deep inside the flue. These inspections detect conditions that simple visual checks miss.
Even minor flaws, such as a small crack or loose brick, can let exhaust gases leak into your home. Over time, this can cause smoke damage or even carbon monoxide poisoning. A professional evaluation ensures the structure not only looks clean but also functions safely and efficiently.
Why Recent Cleaning Does Not Equal Structural Safety
Recent cleaning does not confirm that your chimney structure is sound. Cleaning removes soot and debris, but it does not verify that the chimney’s internal components are intact. Mortar joints, liners, and crowns deteriorate naturally from moisture, heat, and weather exposure.
A chimney sweep and a chimney inspection are different services. Sweeping focuses on removal; inspection focuses on evaluation. The CSIA recommends annual inspections to identify damage that cleaning alone won’t reveal.
Even after a recent cleaning, issues like a cracked liner or missing cap can still pose risks. A structurally weak chimney may collapse under stress or allow heat transfer to surrounding materials. Always ask for documentation of both cleaning and inspection, and confirm whether the evaluation met NFPA 211 standards.
Limits of Seller Disclosures and Basic Inspections
Home sellers are not always aware of hidden chimney problems. Common disclosures usually mention visible damage, but most structural or venting defects stay out of view. Standard home inspections often check only accessible parts of the chimney, not internal flues or concealed masonry.
To protect yourself, you should request a Level 2 chimney inspection before closing, especially if the home has been renovated or experienced fire damage. This level uses video tools to spot internal cracks, blockages, or prior fire evidence.
A basic inspection or seller statement cannot confirm safety against carbon monoxide leaks, debris obstruction, or fire hazards. Only a certified chimney professional can determine whether the system meets current safety standards and is safe for long-term use.
Common Buyer Questions and Edge Cases
Chimney inspections often bring up timing, cost, and repair questions for buyers in Northern Virginia. Understanding when to schedule the inspection, how findings affect negotiations, and how seasonal conditions can complicate access helps you manage both safety and cost before closing on a home.
Should the Inspection Happen Before or After the Home Inspection?
You should schedule a chimney inspection around the same time as the general home inspection but use a certified chimney professional rather than relying on a standard inspector. Most home inspectors only perform a quick, surface-level review of the fireplace and flue.
A chimney technician performs a Level 1 or Level 2 inspection depending on the type of sale and the home’s age. Level 2 inspections use video cameras to view interior flue damage or creosote buildup that is not visible otherwise.
Coordinating both inspections allows you to compare findings. For example, if a home inspector notes moisture around the chimney, the chimney report can confirm if the flashing or crown is the source. Aligning these timelines helps you make fast, informed decisions before contingencies expire.
What Inspection Findings Typically Affect Negotiations?
Common inspection issues that influence purchase negotiations include:
| Issue | Possible Cost Impact | Negotiation Approach |
|---|---|---|
| Creosote buildup | Low to Moderate | Request cleaning credit |
| Cracked flue liner | Moderate to High | Ask for repair or price reduction |
| Missing or damaged cap/flashing | Low to Moderate | Request replacement before closing |
| Structural damage or leaning | High | Evaluate safety and request full repair or withdraw |
Even minor findings, like soot staining or minor mortar deterioration, can serve as leverage for small credits. More serious defects—especially flue cracks or blocked vents—raise safety and carbon monoxide concerns.
You should ask for documentation showing when the chimney was last cleaned or repaired. Lenders or insurance providers may also require proof of correction for major structural or fire-related hazards before loan approval.
When Relining or Repairs Become a Deal Consideration
If the chimney requires relining, it often means the existing liner is cracked or missing sections. In older homes around Northern Virginia built before the 1980s, clay tile liners frequently deteriorate due to heat cycling and moisture.
Relining costs vary based on chimney height and fuel type. Gas appliance flues may use flexible metal liners, while wood-burning fireplaces require insulated liners to meet safety codes. These repairs can range from a few hundred to several thousand dollars.
When repair estimates exceed your remodeling budget, you can request a seller credit or a price reduction. A professional estimate makes your request clear and helps you compare total costs against other properties under consideration.
Seasonal Timing Issues During Real Estate Transactions
Cold weather affects chimney inspections. In Northern Virginia, winter snow or freezing temperatures can limit roof access and hide damage under ice. Inspectors may postpone parts of the exterior review until conditions improve.
If you buy a home in late fall or winter, plan to schedule a recheck once temperatures rise. Some buyers negotiate an inspection holdback—money set aside for later review or cleaning once weather permits.
High humidity in summer can also cause moisture to collect in the flue or flashing gaps. You should confirm proper ventilation and waterproofing before closing to avoid off-season leaks or masonry damage that appear only after heavy rain.
Conclusion: Using Inspection Findings to Make Informed Decisions
Your chimney inspection report provides a detailed snapshot of your fireplace’s condition. How you read and respond to that information can affect your purchase decisions, safety plans, and repair priorities. Using the report effectively helps you stay objective, avoid unnecessary costs, and focus on genuine safety or performance concerns.
Interpreting Results Without Overreacting
When you receive your home inspection report, start by identifying which findings are safety-related and which are maintenance issues. Problems such as cracks in the liner, creosote buildup, or damaged flashing deserve prompt attention because they can affect safety or prevent proper ventilation. Minor items, like small mortar gaps or light staining, often require only basic maintenance.
Create a simple table to help organize repair priorities:
| Category | Example Issue | Typical Action |
|---|---|---|
| Safety | Blocked flue, carbon monoxide risk | Immediate repair |
| Functional | Damper not sealing | Schedule maintenance |
| Minor | Cosmetic brick cracks | Monitor or seal |
Avoid assuming the worst from complex language in the report. Some terms sound serious but refer to routine wear. Ask the inspector to explain unclear sections in plain terms. Taking this approach keeps you calm and focused on practical solutions rather than unnecessary worry.
Knowing When to Seek Further Evaluation or Specialist Input
If your inspection report notes structural movement, concealed damage, or potential moisture intrusion, you should get a specialist evaluation. Chimney professionals use tools such as video cameras or smoke tests to confirm issues that a standard home inspection cannot.
Seek input from a certified chimney sweep or masonry contractor when:
- Damage extends beyond visible surfaces
- Your report lists recurring moisture or flue problems
- The home recently experienced severe weather or fire
A secondary inspection can provide estimates, repair options, and confirmation that the chimney is safe for use. This protects you from unexpected repair costs after closing and gives you solid information for negotiations with the seller.