Pellet stoves offer efficient heating, but their safety and performance depend on proper venting and consistent maintenance. Unlike traditional wood-burning systems, pellet stoves use mechanical draft systems and burn compressed wood pellets that produce unique exhaust characteristics. Understanding how these systems handle combustion byproducts and what maintenance they require protects your home and keeps your stove running at peak efficiency.
The quality of wood pellets you burn and how your venting system manages ash residue directly impacts how often you need maintenance and how well your stove performs. Pellet exhaust differs from wood smoke in temperature, moisture content, and acidity, which affects everything from creosote formation to vent pipe corrosion. Your venting system must be designed, installed, and maintained according to specific standards that account for these differences.
This guide walks you through the technical design of pellet exhaust systems, how ash accumulates in different venting configurations, what signs indicate your system needs attention, and how frequently you should schedule professional inspections. You’ll also learn from real-world service patterns observed by certified chimney professionals who understand the specific demands pellet stoves place on venting systems and what maintenance schedules work best for long-term reliability and safety.
Mechanical Draft And Pellet Exhaust Design
Pellet stoves rely on powered combustion blowers to create positive pressure within the venting system, fundamentally distinguishing them from naturally drafted appliances. This mechanical draft affects vent pipe connection integrity, allowable horizontal venting distances, and termination cap placement.
Positive Pressure Venting Versus Natural Draft
Your pellet stove exhaust operates under positive pressure generated by an internal combustion blower. This forced draft pushes combustion gases through the venting system rather than relying on heat buoyancy alone.
The positive pressure system allows for more flexible pellet stove installation configurations, including horizontal venting options that would be impractical with natural draft appliances. However, this pressure creates stricter demands on vent pipe connection sealing to prevent exhaust leaks into living spaces.
Unlike wood stoves that depend on chimney height and temperature differentials, your pellet stove venting system maintains consistent draft through mechanical means. The blower compensates for shorter vertical runs and allows exhaust gases to travel horizontally with minimal elevation change. This capability makes pellet stove venting requirements less restrictive regarding vertical rise but more demanding regarding airtight connections.
Any leak in a positive pressure system will force combustion byproducts outward into occupied spaces. You must seal all joints with high-temperature silicone or approved gaskets specifically rated for pellet stove venting systems.
Horizontal Terminations And Vertical Rise Limits
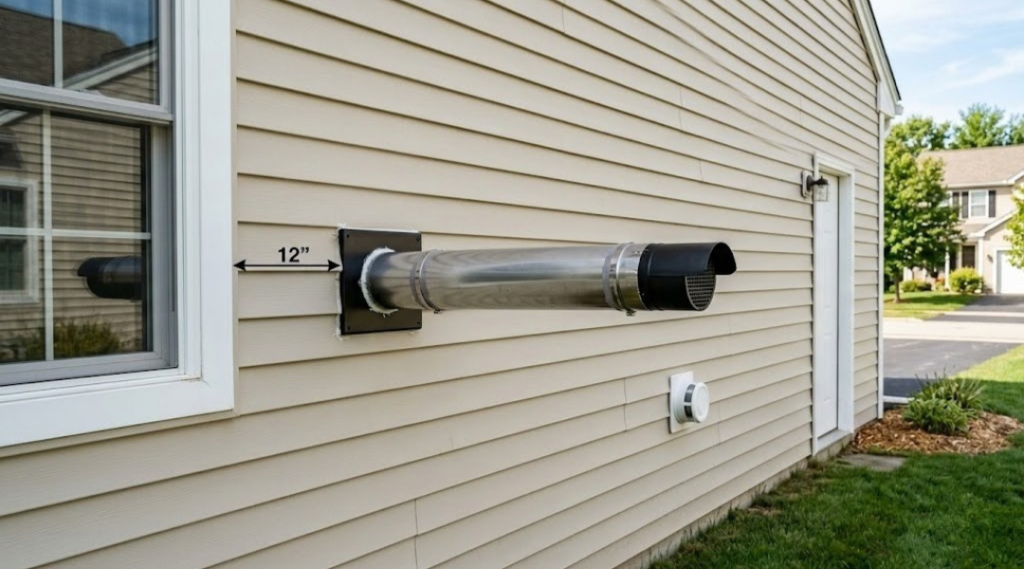
Horizontal venting through an exterior wall represents a common pellet stove venting configuration. Your installation can often terminate with minimal vertical rise, sometimes as little as 12 inches above the exit point.
Manufacturers specify maximum horizontal run lengths, typically ranging from 3 to 15 feet depending on stove model and total vertical rise. Each 90-degree elbow in horizontal venting effectively adds equivalent length to your total run, reducing permissible horizontal distance. You must maintain a slight upward slope of 1/4 inch per foot toward the termination cap to facilitate condensate drainage and prevent accumulation.
Vertical venting through the roof requires attention to different parameters. Your pellet stove venting system needs adequate vertical rise to prevent wind-induced downdrafts while avoiding excessive height that increases cleaning difficulty. Most installations require 3 to 5 feet of vertical rise minimum, with manufacturers providing specific guidance based on total system length.
The termination cap location must maintain proper clearances from windows, doors, air intakes, and property lines. Your horizontal termination should be at least 12 inches below, 12 inches beside, or 12 inches above any window or door opening.
Combustion Blowers And Pressure Balance
Your pellet stove’s combustion blower creates the mechanical draft necessary for proper exhaust flow. This powered component operates at specific CFM ratings matched to the venting requirements and stove heat output capacity.
The blower maintains negative pressure in the burn pot while creating positive pressure throughout the pellet stove exhaust pathway. A vacuum switch monitors this pressure differential to ensure safe operation, shutting down the stove if proper draft conditions fail.
Excessive venting system resistance from long runs, multiple elbows, or undersized pipe diameter forces your combustion blower to work harder. This increased load can lead to premature blower failure, reduced efficiency, and potential safety switch activation. You should design your pellet stove venting system to minimize resistance while meeting all safety clearances.
Proper pressure balance also depends on sealed vent pipe connections and intact gaskets within the appliance itself. Air leaks anywhere in the system disrupt the intended pressure profile, potentially causing incomplete combustion or exhaust spillage. Your pellet stove installation must undergo pressure testing or smoke testing to verify system integrity before operation.
Ash Behavior And Residue Accumulation Patterns
Pellet stoves produce fine fly ash rather than creosote, and this ash settles in specific patterns based on vent geometry, exhaust velocity, and temperature zones. Understanding where deposits form and why certain areas accumulate residue faster helps you prioritize cleanout intervals and prevent blockages.
Fine Fly Ash Versus Creosote Distinctions
Pellet combustion produces fly ash, not creosote. Fly ash is a light, powdery residue composed of mineral content from compressed wood pellets. It lacks the sticky, flammable tar characteristics of wood creosote.
Key differences:
- Fly ash: Non-flammable, fine texture, accumulates as dust layers
- Creosote: Flammable, sticky or shiny, forms thick glazed coatings
Fly ash does not ignite like creosote buildup, but it still restricts airflow when accumulated. Heavy deposits in horizontal runs reduce effective pipe diameter and increase resistance. Your vacuum switch may trip if ash blocks enough of the vent cross-section, causing pressure loss.
Ash weight causes it to settle in low points rather than coat vertical surfaces evenly. This means your cleanout tee and horizontal sections fill faster than vertical pipe.
Vent Diameter And Restriction Sensitivity
Smaller vent diameters magnify the impact of ash deposits. A 3-inch pipe loses proportionally more airflow capacity than a 4-inch pipe when coated with the same ash layer thickness.
Restriction comparison:
| Pipe Diameter | Ash Layer Thickness | Airflow Reduction |
|---|---|---|
| 3-inch | 1/4 inch | ~30% capacity loss |
| 4-inch | 1/4 inch | ~20% capacity loss |
Your combustion fan works harder to maintain draft when ash narrows the vent. Extended vent runs with multiple elbows already operate near maximum resistance limits. Even minor ash accumulation pushes total restriction beyond design tolerances.
You’ll notice symptoms like slower ignition, weak flames, or random shutdowns before complete blockage occurs. These indicate your vent system has crossed the threshold where ash removal becomes urgent.
Heat Exchanger And Vent Connector Deposits
The heat exchanger tubes and vent connector accumulate ash faster than vertical pipe sections. These areas experience turbulent flow and temperature drops that encourage particle settling.
Heat exchanger passages trap ash between fins or baffles. This insulates metal surfaces and reduces heat transfer efficiency. Your stove burns more pellets to achieve target room temperature when exchanger surfaces are coated.
The vent connector between your stove outlet and the first vertical section collects heavy deposits. This horizontal or angled section lacks natural draft assistance, so ash settles immediately after leaving the firebox. Check your cleanout tee at this junction every few weeks during heating season. A full tee forces ash backward into the stove rather than allowing it to exit properly.
Brush these sections during regular ash removal cycles to maintain consistent exhaust flow and prevent blockages that trigger safety shutdowns.
Inspection Criteria And Performance Signals
Evaluating gasket condition, material degradation, and system diagnostics provides critical insight into venting integrity and operational safety. These inspection points reveal hidden failures before they compromise heating efficiency or occupant health.
Gasket Integrity And Joint Sealing
Examine all gasket surfaces where the pellet stove connects to the venting system. Cracked, compressed, or missing gaskets allow air infiltration that disrupts combustion and permits exhaust leakage into living spaces.
Check each joint connection in your flue system using a flashlight and mirror for hard-to-reach areas. Apply high-temperature silicone sealant to any gaps where sections meet, particularly at elbows and tee connections. Loose connections vibrate during operation and progressively worsen air leaks.
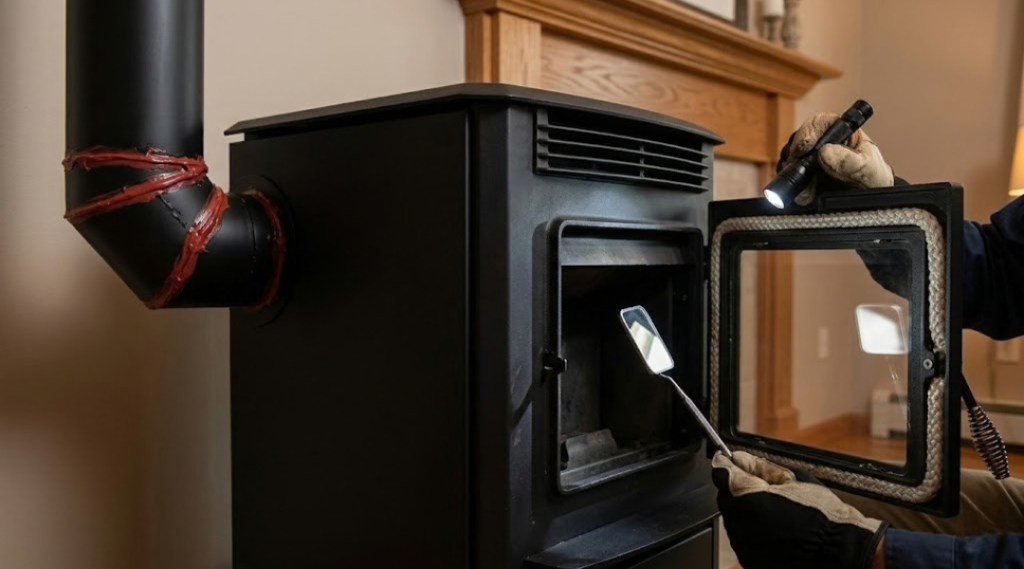
Test seal integrity by running the stove and using an incense stick near joints. Smoke drawn toward connections indicates air leaks that require immediate resealing. Carbon monoxide detectors should be functioning throughout this inspection, as compromised seals represent a significant poisoning risk.
Inspect the door gasket on your pellet stove by closing a dollar bill in the door and attempting to pull it out. Resistance should be consistent around the entire perimeter. Replace door gaskets annually if you operate your stove daily during heating season.
Corrosion In Pellet Vent Materials
Inspect your stainless steel chimney liner for white, brown, or green deposits that signal corrosion from acidic condensate. Pellet exhaust contains sulfuric and hydrochloric acids that attack inferior materials and degrade even quality stainless steel over time.
Check horizontal vent sections first, as condensation accumulates where exhaust gases cool. A masonry chimney without proper liner protection deteriorates rapidly from pellet stove use. Flaking metal or visible pitting requires immediate section replacement.
Examine the exterior termination cap for rust perforation and structural weakness. Corroded caps restrict airflow and allow moisture entry that accelerates interior venting component degradation.
Your chimney sweep should document corrosion patterns during annual chimney cleaning. Localized corrosion at joints indicates failed sealant, while uniform surface oxidation suggests condensation management issues. Upgrading to 316-grade stainless steel provides superior acid resistance compared to standard 304-grade materials.
Error Codes And Exhaust Flow Readings
Monitor your pellet stove’s control board for error codes related to exhaust pressure or vacuum switch failures. These codes indicate restricted airflow from creosote buildup, blocked vents, or failed gaskets compromising the pressure differential.
Record baseline exhaust temperature readings at the stove outlet during normal operation. Temperature drops of 50°F or more from your baseline suggest restricted flow requiring immediate chimney maintenance. Use an infrared thermometer to track changes over the heating season.
Check vacuum switch operation by accessing the pressure tubing connection. Debris or condensation in this line triggers false pressure readings that shut down the stove. Clean or replace the tubing if error codes persist after chimney liner installation inspection confirms clear passages.
Note increased ash accumulation in the burn pot or window glass clouding faster than normal. Both symptoms indicate incomplete combustion from inadequate draft caused by venting restrictions or air leaks upstream in the flue system.
Service Patterns Observed By A Chimney Expert In Sterling, VA
Sterling’s climate and building patterns create specific challenges for pellet stove venting. The region’s humidity levels, suburban density, and evolving building codes shape how professionals approach installations and maintenance.
Condensation Risk In Mid-Atlantic Humidity
Sterling’s humidity fluctuates significantly between seasons, creating condensation challenges in pellet stove venting systems. The Mid-Atlantic climate produces temperature differentials that cause exhaust gases to cool rapidly inside vent pipes, leading to moisture accumulation. Professional installation teams address this by ensuring proper vent pipe insulation and maintaining adequate draft velocities.
When you vent a pellet stove through an existing chimney, condensation becomes more problematic. Older masonry chimneys lack the insulation needed to keep exhaust gases warm enough to prevent water vapor from condensing on interior surfaces. This moisture damages mortar joints and creates creosote-like deposits that restrict airflow.
Chimney experts in the area typically recommend stainless steel liners when adapting an existing chimney for pellet stove use. These liners maintain higher flue temperatures and provide smooth surfaces that resist condensation buildup. Regular inspection of condensate drains and proper maintenance of horizontal vent sections prevents water damage and ensures efficient operation year-round.
Vent Routing In Dense Suburban Construction
Sterling’s suburban neighborhoods present unique spatial constraints for vent routing. Homes built close together require careful planning to meet clearance requirements from property lines, windows, and air intake vents. Your vent termination must sit at least 12 inches from doors and windows, which limits routing options in tightly-spaced developments like Dulles Town Center and Potomac Falls.
Common routing challenges include:
- Limited exterior wall access due to attached garages
- Shared walls in townhome communities
- Landscaping and deck structures blocking optimal vent paths
- HOA aesthetic restrictions on visible vent pipes
Professional installation teams often route vents vertically through existing chimney structures when horizontal runs prove impractical. This approach reduces visible exterior piping while maintaining proper draft characteristics. The installation requires proper sealing at the chimney entry point and verification that the existing chimney structure can accommodate the additional penetration without compromising structural integrity.
Code Compliance Trends In Northern Virginia
Northern Virginia has adopted stricter building codes that affect pellet stove installations. Loudoun County, which includes Sterling, requires permits for all solid fuel appliance installations and mandates inspections before systems become operational. Your professional installation must meet both manufacturer specifications and local code requirements to pass inspection.
Recent code updates emphasize carbon monoxide detection and proper combustion air supply. New installations require hard-wired CO detectors on every level of your home, not just near the appliance. The codes also specify minimum fresh air requirements, which affects how you can vent a pellet stove through an existing chimney that may lack adequate combustion air provisions.
Inspection patterns reveal increased scrutiny of clearances to combustible materials. Sterling area inspectors consistently verify that vent pipes maintain proper spacing from wood framing, insulation, and exterior trim materials. They also check for proper flashing and weather sealing where vents penetrate roofs or walls, ensuring installations protect your home from water infiltration and heat damage.
Maintenance Frequency, Efficiency, And Risk Tradeoffs
Pellet stove maintenance decisions often involve balancing cleaning schedules against wear on components, evaluating when temporary adjustments become permanent problems, and understanding how deferred upkeep compounds efficiency losses over time.
Cleaning Intervals Versus Component Wear
Daily burn pot cleaning prevents clinker buildup but requires repeated scraping that can gradually wear down cast iron surfaces. Weekly ash removal protects heat exchangers yet frequent vacuuming around blower motors risks dislodging electrical connections if done carelessly.
Monthly exhaust pathway cleaning maintains airflow but accessing these channels often requires removing panels secured by screws that strip after excessive handling. You should alternate between light surface cleaning and deeper interventions to minimize mechanical stress. Using soft brass brushes instead of steel scrapers extends burn pot lifespan by 40-60% in typical residential use.
Component wear patterns:
- Burn pot surfaces: 2-4 years with daily aggressive scraping, 5-7 years with gentler weekly approach
- Heat exchanger tubes: Minimal wear from cleaning, significant wear from ash accumulation
- Door gaskets: Compression from frequent opening reduces seal life by 15-20% annually
Professional annual inspections identify wear before components fail completely, allowing planned replacements during off-season rather than emergency mid-winter repairs.
Vent Resizing Versus Continued Adjustment
Undersized venting creates back pressure that forces you to repeatedly adjust air intake settings and damper positions throughout each heating season. These constant tweaks mask the underlying restriction while straining auger motors and exhaust fans working against inadequate draft.
Upgrading from 3-inch to 4-inch venting eliminates adjustment cycles but requires chimney modification costs between $400-$800. Continuing adjustments appears cheaper initially yet accelerates blower motor replacement from typical 8-year intervals to 4-5 years. Restricted vents also increase creosote formation rates by 30-50%, requiring chimney cleaning every 4-6 weeks instead of seasonally.
Your pellet consumption rises 12-18% with inadequate venting as incomplete combustion wastes fuel. Calculate five-year costs including extra pellets, motor replacements, and frequent chimney service against one-time vent upgrade expenses to determine the actual economical choice.
Efficiency Loss And Long-Term System Strain
Skipping monthly heat exchanger cleaning reduces thermal transfer by 8-12% within 30 days of operation. This efficiency drop forces longer burn cycles to maintain room temperature, consuming an additional 15-25 pounds of pellets weekly in typical 40,000 BTU units.
Accumulated ash in exhaust pathways restricts airflow gradually rather than suddenly. You may not notice the 3% monthly efficiency decline until your stove operates at 70% capacity after one season of neglected pellet stove cleaning. Combustion blowers running against restricted airflow draw 20-30% more electricity while producing less heat.
Cumulative effects of deferred maintenance:
- First month: 8% efficiency loss, minor strain
- Three months: 22% efficiency loss, elevated motor temperatures
- Six months: 35% efficiency loss, sensor malfunctions begin
- Full season: 40-50% efficiency loss, component failure likely
Stove maintenance schedules prevent this degradation cascade. Restoring a heavily neglected system requires professional deep cleaning costing $300-$500 versus $50-$75 in supplies for consistent owner-performed upkeep.